
Build a Car With Your Kid · Chapters 34 and 35
Club pack: the car build with 6 to 12 children
Note
Untested in a group. This chapter is built from Part 1 and from research on working in pairs. No club has run this build yet. If you are the first, tell me how it went at troniction.com/go/car.
With one child, you are the checker. With twelve, you can't be. The design that scales is Part 1's, moved one level down: two children per car, one builds and one checks, and the adults keep the two jobs no child does, the cells and the software install.
Pairs, roles and the swap
Give each pair one car, one tray of parts and one printed copy of the stage they are on.
| Role | Who | Does | Never |
|---|---|---|---|
| Builder | One child | Every wire, screw and push-fit; presses Upload; the holder's switch; types the test letters | Cells, charger, software install |
| Checker | The other child | Reads each step aloud; compares the wire with the picture; ticks the checklist; asks the talk prompt | Takes the part out of the builder's hands |
| Adult | You | The prep, the cells, the install; walks the room; answers "which box?" with a question | Fixes the car |
Swap the roles at every stage test, so both children build and both check. Pairs did better than students working alone in university programming courses (Umapathy and Ritzhaupt, 2017 [meta]); that is adults writing code, so treat it as a reason to try pairs, not a promise. The main problems were scheduling and partners who didn't get on (Hanks and colleagues, 2011 [review]), so choose the pairs yourself. Three in a group works if you must: the third holds the tray and reads ahead, and all three rotate.
Before the day
Several stalls happen before anyone touches a wire: a locked laptop, a charge-only cable, cells never charged. Chapter 2's prep list becomes this, once per car:
- Every laptop: install the Arduino IDE and see the port appear with a bare board (Chapter 6), and download the sketch (troniction.com/go/car-sketch). A locked school laptop may refuse the install: ask whoever manages it a week before.
- Every phone: Chrome on Android or Bluefy on an iPhone for the HM-10; Android only for the HC-06. Buy one kind of module for every car.
- Charge every cell (Chapter 5's rules) and label each pair with its car's number.
- Pack one numbered tray per car and run Chapter 4's find-it list on each.
- Print the step cards, the pre-power checklist, the role card and the loop card for each pair: they are all in the club pack at the end of this chapter.
- Spares: jumper wires, the two resistors, one known-good USB data cable and, if you can, a spare board and a spare Bluetooth module: a failed one ends a pair's session.
The session plan
A club session ends at a stopping point (after the Stage A test, the wheels test, test C1 or the drive) or before Stage A starts, never in the middle of a stage.
| Session | Read and build | Ends when | Adult jobs | Your time |
|---|---|---|---|---|
| 1 | Chapters 3–5 together; unbox and find; Stage A (Chapter 6) | Car ready in the Serial Monitor | Walk the room at the upload | ____ min |
| 2 | Stage B (Chapters 7–9) | The wheels test passes and the board stays on without the USB | Cells in, at each table, after the checklist | ____ min |
| 3 | Stage C (Chapter 10) | Test C1; C2 if there is time | All power off before the module goes on | ____ min |
| 4 | Stage D (Chapter 11) | The car drives off the box | The runway; cells out and counted | ____ min |
Time each session on your first run, from the first page read to the test that passed: it is your best guide to the next group, and the next edition wants it. A pair that finishes early does the "Try this" at the end of a Part 2 chapter; a pair a stage behind starts the next session at its own stopping point.
Batteries in a group
The cells are the most dangerous thing in the box. Chapter 5's rules hold; a group adds four:
- The cells live in one box, held by an adult, and come out at a table only for the power step in Chapter 9, after the pair has read the pre-power checklist aloud. With more than about four cars, a second adult at the cell station keeps pairs from waiting (untested).
- "Switches off" is a room-wide call. Before any wiring change the builder switches off and the checker says so out loud. "All power off" means the USB unplugged and the switch off.
- At the end of every session the cells come out and are counted back in. A dented, swollen or oddly warm cell goes aside and is recycled.
- No charging during the session, and never unattended afterwards.
The room
The figure shows one way to lay out the four things that matter.
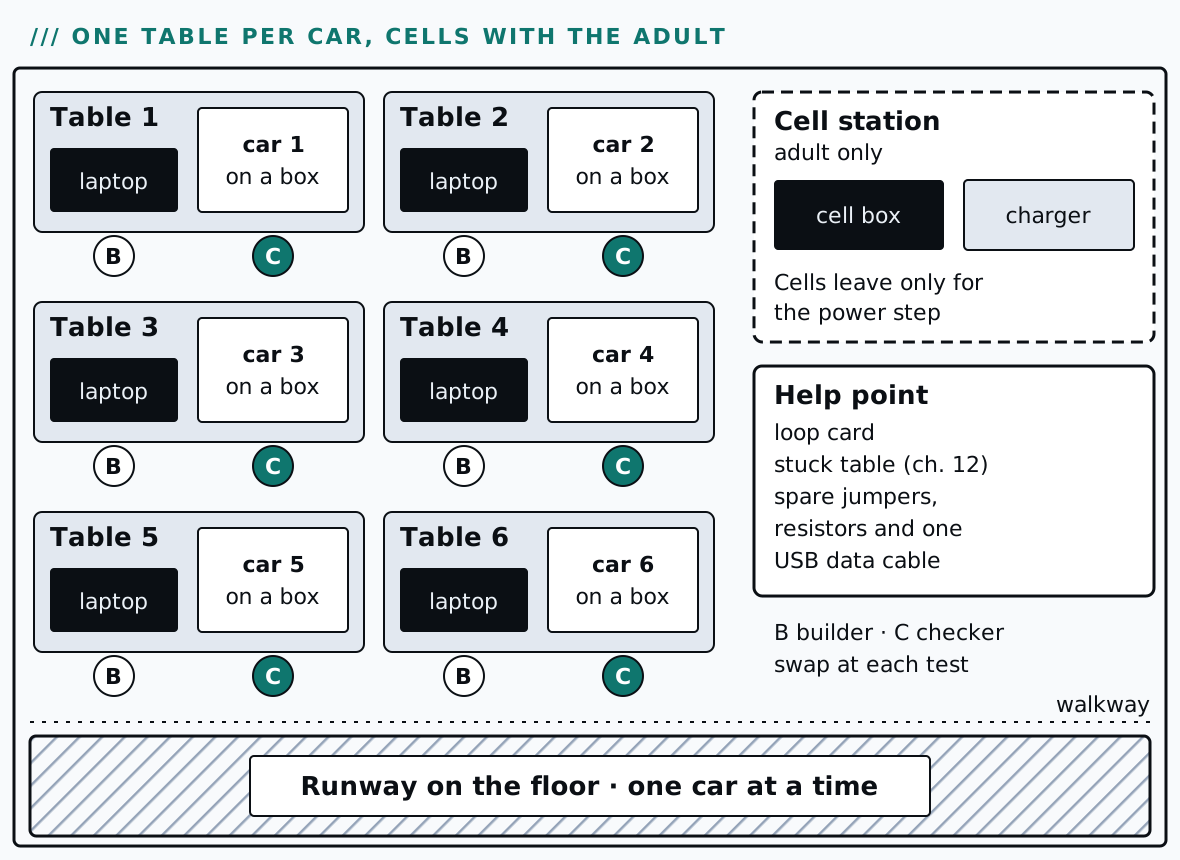
- Each car stays on its box until Stage D, so a wheels test can't drive it off the table.
- The cells and charger have their own station, with an adult, on a hard surface.
- The runway is on the floor, away from the tables. One car at a time.
- A help point with the loop card and Chapter 12's table. A stuck pair goes there first.
Many identical modules. Every module of one kind shows up under the same name, so connect one car at a time and press the horn: the car that beeps is yours. Then keep each phone with its car. (Renaming the modules, which Make It Connect covers, is an adult job before the day.)
When a pair is stuck
The 10-minute rule becomes "run the loop, then raise the card". When you get there, ask before you touch anything: "What exactly happens? Which stage test still passes? What did you change last?" Then point at the picture, not the wire. Keep a tally of where pairs got stuck, by stage: it shows the step the book explains badly, which is exactly what I want to hear about.
Photos: hands and cars, not faces, and your club's consent rules. When in doubt, film from above.
Role cards
Print one role card per pair. It has the roles, every talk prompt in Part 1 with its “Listen for” line, the loop and the checklist before power. In a club the checker is the second child, and the roles swap at every stage test. The step cards and test boxes are in the bench pack.
The one-week check
On the day of the first drive, everything looks like learning. The car moves, your child explains the H-bridge, the room is loud. A week later is when you find out what stayed. How easy something feels while you learn it is a poor guide to what you keep; what you can still do later, without help, is the honest measure (Chapter 33).
This check takes about twenty minutes, a week after the first drive, without the book open. It has two parts: one fault you plant in the car for your child to find and fix, and three questions your child answers out loud. Then you score both on the rubric in the table in Chapter 35, and the rubric tells you what to do next.
Note
This is a check, not a test. Tell your child that: "I want to see whether the book did its job." If something isn't there, that is information about the book and about what to practise, not about your child.
Part 1: the planted fault
Warning
You plant the fault with all power off: the USB unplugged and the holder's switch off. The cells stay where they are; you don't need to touch them. Any wire you take off a pin goes where its bare end touches nothing: into an empty row of the breadboard that no other wire uses.
Choose one fault. Plant it while your child is out of the room.
| Fault | What you do, power off | What your child will see |
|---|---|---|
| A. One side reversed | Swap the two motor wires of one side in their screw terminals (OUT1 and OUT2, or OUT3 and OUT4) | Forward makes the car spin on the spot |
| B. A speed cap back on | Pull the board's speed wire off ENA and push its end into an empty breadboard row. Then push a jumper cap onto ENA | That side always runs at full speed; the speed letters change only the other side |
| C. A data wire off | Pull the Bluetooth module's TXD wire off pin 2 on the board and push its end into an empty breadboard row | The phone connects, but the car ignores every button |
Then hand over the car: "Something is wrong with the car. Find it and fix it." Start a timer.
The rules for you:
- Stay quiet. Don't hint, don't point, don't look at the right place.
- Your child may ask you to read any page of the book aloud, but not to open it at the right page. Finding the right page is part of the task.
- Safety still holds: the switch goes off before any wire is touched, and the cells stay yours.
- Stop at 15 minutes. If the fault isn't fixed by then, say "Let's finish this one together with the book," and do. Fifteen minutes is the target the book was designed to; it is not a norm, and missing it tells you what to practise.
Write down, as it happens: what your child looked at first; whether they named a box; whether they ran a stage test before changing anything; whether they changed one thing at a time; and how long the fix took.
Part 2: three questions, out loud
These six questions are new: none of them is in the chapters. Each one asks your child to use the four boxes on a car or a situation they haven't seen. Always ask question 1. Then ask the two that go with the fault you planted, so no question gives the fault away:
| You planted | Ask |
|---|---|
| A (one side reversed) | 1, 2 and 6 |
| B (a speed cap) | 1, 3 and 5 |
| C (a data wire off) | 1, 3 and 4 |
Read the question; don't help; write down what your child says, in their words. The answers are at the back of the book, under Chapter 35, and in the club pack.
- Fine on the box, not on the floor. A car's wheels all turn when it is on the box. On the floor, every time it starts to move, it stops, and the board's L light goes out for a moment and comes back on. What is happening, and what do you try first?
- The speed letters do nothing. On a friend's car, the phone says connected and
F,B,LandRall work, from the phone and from the Serial Monitor. But1and9give exactly the same speed, on both sides. Which boxes do you know work? Where would you look? - Backwards on both sides. A car goes back when you press Forward, and forward when you press Back. Left turns it right, and Right turns it left. What is wrong, and what is the smallest fix?
- One side flat out. On someone else's car, one side always runs at full speed and the other side's speed changes with the speed letters. Name two different faults that would do this, and how you would tell them apart without a meter.
- Silent car. A car drives from the phone, forward, back and both turns, but the horn makes no sound and neither does the reversing beep. Which box is it in, and what do you check first?
- Never connects. On a car with an HM-10, the module's light keeps blinking, and the remote never says connected, however many times you press Connect. Which box is it, and what are two things to check?
The rubric
Score each row from your notes. The point of the rubric is the last column: each score comes with the next thing to do.
| What you look for | Not yet | Getting there | Secure | Next step |
|---|---|---|---|---|
| Names a box | "It's broken" or "it's the code" | Names a part, but not the box it belongs to | Names the box, and says which stage test would prove it | Not yet: reread Chapter 3 together and redo its talk prompt on the real car |
| Tests before changing | Starts pulling wires out | Changes something, then tests | Runs a stage test first, then changes one thing | Not yet or Getting there: do Chapter 21 together |
| One change at a time | Changes several things at once | Changes one thing but doesn't undo it when it didn't help | Changes one thing, tests, undoes it if it didn't help | Use the loop card at the next fault, out loud, one line at a time |
| Says what was found | Can't say why it works now | Says what they did ("I swapped the wires") | Says what was wrong and why the fix works ("this side was backwards, so the car spun") | Ask "why did that fix it?" after every fix from now on |
| Safety | Touches wiring with the switch on | Switches off when reminded | Switches off before touching anything, unprompted | Not yet: stop and reread Chapter 5 together before the car is used again |
| The three questions | 0 or 1 answer names the right box | 2 answers name the right box (the book's target) | 3 of 3, each with a reason | Fewer than 2: try the Part 3 puzzles (Chapter 25) together, one a day |
The book's targets: at least two of the three questions answered with the right box, and the planted fault found and fixed within 15 minutes. They are the targets this book was designed around, not norms for children of any age. A child who misses them hasn't failed anything: the book, or the practice, has a gap, and the "Next step" column says where.
Note
In a club. One child at a time takes one adult about twenty minutes each, which is hours for a room. Instead, plant one fault per car (A, B or C, mixed across the room), and have each pair swap to another pair's car. The builder finds and fixes; the checker ticks the record sheet's five rows; the adult only times and checks that the switch goes off first. The three questions are answered on paper, one sheet each, without the book: score "names the right box" from the writing. Untested in a group, like the rest of Chapter 34. A record sheet for this check, one per child, is in the club pack at troniction.com/go/car-club.
Answers to the six questions, for the adult
Show the answers
- Fine on the box, not on the floor. The board is restarting: the L light goes out because the board resets, and comes back on when the sketch starts again. On the floor the motors work much harder and pull more from the cells; tired or half-charged cells can't keep the voltage up, and the board's supply dips. That is the battery, feeding the board. Charge the cells first. Then, switch off, and tug-test the battery leads at the board's Vin and GND.
- The speed letters do nothing. The phone, the module and the board all work: letters arrive from both and the car obeys the direction letters. The fault is in how speed reaches the motor driver: both jumper caps still on ENA and ENB, or both speed wires on pins that can't control speed (only 3, 5, 6, 9, 10 and 11 can). Look at the motor driver's caps first: it needs no tools.
- Backwards on both sides. Both sides are wired the same way round, but that way is the opposite of what the sketch calls forward. Left and Right swap for the same reason: each side turns the opposite way to the one the sketch asks for. The smallest fix is to swap the two motor wires on both sides, with the switch off. Swapping one side would make it spin.
- One side flat out. A jumper cap left on (or put back on) that side's ENA or ENB, or that side's speed wire on a pin that can't control speed. Look at the motor driver first: a cap is visible. If there is none, follow that side's speed wire to the board and check its pin number against the pin table.
- Silent car. Not the phone, the Bluetooth module or the link into the board: the car drives, so letters arrive and the board acts on them. The fault is in the board's output to the buzzer: its three wires. Switch off, then check the buzzer's S wire is on pin 4, and its + and − are in the breadboard columns the board's 5V and GND go to (Chapter 8).
- Never connects. The Bluetooth module's box, and the phone's side of it: the blinking light says the module has power but no connection. Check that you opened the remote page in Chrome on Android or Bluefy on an iPhone (not the phone's Bluetooth settings, and not Safari); and on Android, that Chrome is allowed to find nearby devices.
Record sheet: the one-week check
One per child. The checker ticks a column for each row while the builder works; the adult times and checks the switch goes off first. The rows are the rubric’s.
Name: ______________________ Car: ____ Fault planted: A / B / C
Looked at first: ______________________________ Time to fix: ____ min
| Not yet | Getting there | Secure | |
|---|---|---|---|
| Names a box | |||
| Tests before changing | |||
| One change at a time | |||
| Says what was found | |||
| Safety | |||
| The three questions (right box) |
Questions asked (1 plus the two for the fault): ____ ____ ____ Answers in the child’s own words go on the back.
Every chapter’s questions
The questions that end each chapter, by part. Ask them out loud first; the answers are behind each tap.
Part 1: Build it together
Chapter 2: How to help without taking over
- Your child has put a wire in the wrong pin. What do you do, and what do you say?
- You've both been stuck for 10 minutes. What now?
Answers
- Don't touch the wire. Point at the figure and ask, "Which pin does the picture say?" Your child finds the difference and moves the wire (Chapter 2).
- Stop trying random changes. Run the debugging loop from Chapter 3, then turn to Chapter 12 or scan the stage's code for its video and test page (Chapter 2).
Chapter 3: The four boxes
- The phone shows connected. Which boxes has that proved work, and which hasn't it?
- Which two parts does the battery feed directly?
Answers
- Only the phone and the Bluetooth module, and the link between them. It hasn't proved that the letter reaches the board, or that the wheels turn (Chapter 3).
- The motor driver and the board (Chapter 3).
Chapter 4: Unbox and find
- Your motors arrived with no wires, just two small metal tabs on each. What went wrong?
- Guess now, and you'll find out in Stage B: which pins on the board can control the motors' speed? (This is a guess, not a test. Look at the board for a clue.)
Answers
- They're the unwired version of the motor, which needs soldering. Return them and buy motors with wires attached, such as Adafruit #3777 (Chapter 4).
- Only pins 3, 5, 6, 9, 10 and 11, the ones with the
~mark. This car uses 5 and 6 for speed. Chapter 8 tells the story of a car that got this wrong for years.
Chapter 5: Safety: read this together
- Which two things must be true before anything in the car is live?
- A cell is dented. What do you do with it?
Answers
- The cells are in the holder, and the holder's switch is on. (And remember the board can also be fed by the USB cable, so "all power off" means the switch off and the cable out.) (Chapter 5)
- Stop using it. Don't bin it: take it to a battery recycling point (Chapter 5).
Chapter 6: Stage A · The board: put the sketch on it
- The ON light is lit, but the laptop shows no new port. What's the most likely cause?
- The L light blinks slowly forever and the Serial Monitor is empty. What does that tell you?
Answers
- The USB cable only charges and has no data wires. Try another cable. If the board is a clone with a CH340 chip, it may also need its driver (Chapter 6).
- The sketch never reached the board. The board is still running the blink program it came with. Upload again and wait for "Done uploading" (Chapter 6).
Chapter 7: Stage B1 · Chassis and motors
- Why do the two left motors share one pair of screws?
- You tug a wire and it comes out. What was wrong?
Answers
- Because the two motors on one side always do the same thing. To go forward both turn forward; to turn, one whole side goes backwards (Chapter 7).
- The screw wasn't clamping the metal pin: the pin wasn't pushed in far enough, or the screw clamped the plastic. Loosen, push in fully, tighten, tug again (Chapter 7).
Chapter 8: Stage B2 · Motor driver to the board
- Every speed button gives the same speed. Name two causes.
- Predict: you swap the wires on IN1 and IN2. What changes?
Answers
- A cap is still on ENA or ENB, or a speed wire is on a pin without the
~mark, which can't do speed (Chapter 8, Chapter 8). - The left side turns the other way, for every letter: forward becomes backward for those two wheels. The right side doesn't change (Chapter 8).
Chapter 9: Stage B3 · Power, and the wheels test
- You type F and the car spins on the spot. Which stage does that belong to, and what do you change?
- You unplug the USB cable and the ON light goes out. What's missing?
- Why does the car sit on a box for this test?
Answers
- Stage B, the wheels. One side is turning backwards. Switch off, and on that side swap the red and black wires of both motors. Then type F again, because after any change to the motor wires you go back to F (Chapter 9).
- The jumper from the motor driver's +12V screw to the board's Vin pin, or the one from GND to GND, or one isn't clamped. The battery reaches the motor driver but not the board (Chapter 9). In the four boxes of Chapter 3, it's the battery's power line to the board that's broken.
- So the wheels can spin without the car driving off the table, and you can watch all four at once (Chapter 9).
Chapter 10: Stage C · The Bluetooth module
- The module's light is off. Which wires do you check first, with the power off?
- With an HM-10, an Android phone's remote page says no devices found. What do you check?
Answers
- The module's power: VCC in column 1 and GND in column 12, and the board's 5V and GND jumpers that feed those columns (Chapter 10).
- That the phone's Location is on and Chrome has the Nearby devices permission. And that the module isn't paired in the phone's Bluetooth settings; if it is, Forget it there (Chapter 10).
Chapter 11: Stage D · The round trip, then drive
- The Serial Monitor shows
Got F from phoneand the phone showsCar heard: F, but the wheels don't turn. Which boxes are fine? - Predict: you press X while the car is driving forward. What happens?
Answers
- The phone, the Bluetooth module and the board are all fine. The letter arrived and was answered. Look in the wheels box and its power: is the holder switched on? Then redo the wheels test (Chapter 11).
- The car keeps driving forward while the song plays, about 16 seconds, and it ignores any letter you send until the song ends. Then the song starts again, until a new letter arrives. Part 4 explains why and shows how to fix it (Chapter 11).
Chapter 12: If it doesn't move
- The car drove yesterday. Today it stops and restarts every time it starts moving. What changed?
- Two wheels turn and two don't. Which stage test do you redo first, and why?
- Which box? (a) The module's light is off. (b)
Got F from USBappears, but the left wheels stay still. (c) The remote says connected, but the Serial Monitor shows nothing when you press Forward.
Answers
- Most likely the cells have run down. When the motors start, the voltage dips below what the board needs, and the board restarts. Charge the cells (Chapter 12).
- The wheels test from Stage B, with the car on its box and the USB cable in. It's the test that only the wheels box can fail. If
Got F from USBappears and two wheels still don't turn, check those motors' wires in their screws and the six signal wires, starting with the side that doesn't move (Chapter 12). - \(a) Test C1, the module's power: VCC, GND and the board's 5V and GND jumpers. (b) The wheels box: the left motors' wires, or ENA, IN1 and IN2. (c) Stage D: the letter isn't reaching the board, so check TXD to pin 2 (Chapter 12).
Part 2: Why it works
Chapter 14: Volts, amps and a shared ground
- Why can't the board run a motor straight from one of its pins? Use the two numbers from this chapter.
- Someone removes the black wire between the motor driver's
GNDand the board'sGND, but leaves the battery connected to the motor driver. Predict what the motors do when you sendF, and say why. - Use the rule current = voltage ÷ resistance: if pin 3 were at 5 V with only the 1,000 Ω resistor to ground, how much current would flow? Is that still a "signal-sized" current?
Answers
- A pin is rated for 20 mA (40 mA is the absolute maximum), and a free-running gear motor wants about 150 mA, over 1,000 mA when stalled. The pin can signal, but it cannot push; the motor driver does the pushing.
- They most likely do nothing. The motor driver has power (its red light is on), but the signals from the board have no way back to the board, so the motor driver can't tell HIGH from LOW. That is the site's "nothing moves; the red power LED is on" row, and the first thing to check is the shared ground.
- 5 ÷ 1,000 = 0.005 A = 5 mA. That is still a signal-sized current, well under the pin's 20 mA.
Chapter 15: The board
- You want to move
ENAoff pin 5. Which pins could it move to, and why not pin 13? - What survives a power-off: the program, or the speed you chose? What does the car do with its speed when it starts again?
- Your car is driving on the floor from the phone, with no USB cable. You press the board's reset button. Predict what the car does, step by step.
Answers
- Only to a PWM pin: 3, 6, 9, 10 or 11. Pin 6 is
ENBand 9, 10, 11 are taken by direction wires, so you would have to move a direction wire to a free non-PWM pin first. Pin 3 is the board's talking pin to the module. (One more catch you'll meet in Part 4: while the buzzer plays, pins 3 and 11 can't do PWM, because the sound uses the same timer.) Not 13, because 13 can't do PWM: every speed would become full on, which is the 2021 bug. - The program survives (it is in flash). The speed doesn't (it was in working memory). On every start the sketch sets the slowest speed again and holds the wheels still.
- The car stops: the board restarts, runs the sketch from the top, and holds the wheels still. The
Llight goes out for a moment and comes back on. It will drive again when the phone sends the next letter. If you were at speed 9, you are back at the slowest speed.
Chapter 16: The motor driver and the H-bridge
IN1andIN2are both HIGH. What does the motor do? Is that the same asENAbeing off?- Why does the motor driver get warm, and where does that energy come from?
- One side of your car turns the wrong way. You could swap its two motor leads in the screw terminal, or swap the
IN3andIN4wires at the board. Explain why both fixes work. (Look back at Chapter 9.)
Answers
- It brakes: both ends of the motor are tied to plus, so the motor's own generated current loops round and stops it fast. That is not the same as
ENAoff, which opens every switch and lets the motor coast. The car'sSuses the brake. - Each closed transistor keeps a little voltage, about 2 V for the pair at these currents, and that lost voltage times the current flowing is heat in the chip. The energy comes from the battery.
- Swapping the motor leads reverses the current through that motor for the same
INpattern. SwappingIN3andIN4reverses theINpattern itself, so the bridge sends the current the other way. Either way, the current through the motor is reversed, and so is the motor.
Chapter 17: Speed is a trick: PWM
- Chapter 15 said a non-PWM pin rounds every value of 128 or more to full on. Using the ladder, what would speed
0do ifENAwere on pin 13, and why? - Why not start the ladder at 0? What would the bottom few buttons do?
- Your friend's car moves the same at every speed. Name two different faults that cause exactly this, one in the wiring and one on the motor driver. (Chapters 15 and 9 have one each.)
Answers
- Full speed. On this car
0sets the value 150 (the same as1), and 150 is more than 128, so pin 13 would simply switch fully on. Every step on the ladder would do the same: that is the 2016–2026 bug. - Below the floor the motors can't overcome the gears and the car's weight, so the bottom buttons would only make the motors hum and warm up. Starting at 150 means every button moves the car (on the 2021 car, at least: that is the author's choice, not a measurement).
- A speed wire on a non-PWM pin (for example pin 13): every value from 128 up becomes full on. Or a jumper cap still on
ENAorENBon the motor driver: it ties the enable to 5 V, so the board's PWM never reaches the bridge. Same symptom, two causes.
Chapter 18: Motors, gears and skid steering
- A friend built a car from a different guide.
FandBwork, butRturns it left andLturns it right. Using Chapter 16's letter table, what is different about how it was built? - What would happen to the car if the motors had no gearbox and drove the wheels directly?
- Speed
1moves your car on the kitchen floor but not on the rug. Use Chapters 17 and 18 together to explain why.
Answers
- Its two sides are on each other's screw terminals: the left motors are on
OUT3/OUT4and the right ones onOUT1/OUT2.FandBdrive both sides the same way, so they can't show it;LandRdrive the sides differently, so they swap. Chapter 9's wheels test is built to catch exactly this. - The wheels would try to spin about 48 times faster with about 1/48 of the turning force, which is far too little to move a car carrying a battery. It would most likely sit still and hum, or barely creep.
- Speed
1is a 59% duty cycle, which gives the motors a fairly small average push (Chapter 17). On the smooth floor that push is just enough to roll the wheels; the rug grips and drags the tyres, so the same push isn't enough. The floor speed depends on the surface.
Chapter 19: Power: cells, Vin and brown-outs
- Why would four AA cells not work well in this car? Give two reasons.
- The car resets when it starts moving. Explain it in one sentence.
- The car stops by itself in the middle of the kitchen. The phone still says it's connected and the Serial Monitor shows the letters arriving. Which box from Chapter 3 do you check first, and what is the first thing you do? (Use Chapter 12 too.)
Answers
- They give about 6 V fresh (less as they drain), which is below the board's recommended 7 V, and leaves the motors only about 4 V after the motor driver's 2 V. And ordinary AA cells sag badly at the currents motors draw.
- Starting four motors draws a big current, the battery's voltage dips under it, and the board's supply sags low enough that the chip restarts: a brown-out.
- The wheels box (motor driver and motors), and its power: the letters prove the phone, the module and the board all work. Before anything else, switch off and charge the cells, then try again.
Chapter 20: The Bluetooth module: how a letter reaches the board and back
- On a friend's car, the module's
TXDandRXDwires have been swapped at the board. Predict the symptom on the remote and in the Serial Monitor, and say what to do first. - Why does the module need 3.3 V on its
RXDbut not on itsVCC? - The phone says connected, the Serial Monitor shows
Got F from phone, but the wheels don't turn. Which boxes are proven, and which is left? (Chapter 16 has a cause that fits.)
Answers
- The remote connects (the radio is fine), but nothing arrives: no
Got F from phone, noCar heard, no movement. Talk is wired to talk, so nobody listens. Swapped at the board, this can also strain the module: pin 3's 5 V reaches itsTXDwith no resistor. Switch off and swap them back. (Chapter 23's swap is at the module end, where the 1 kΩ resistor limits the current.) RXDgoes straight to the module's 3.3 V chip, so it needs the divider.VCCgoes to the module's own regulator, which is built to take 5 V and make 3.3 V.- The phone, the module and the module's wire to the board are proven (and the board is running). What's left is the board's signals to the wheels: the motor driver, its power and the motors. A jumper cap left on, a loose signal wire, a missing shared ground or the battery switch are all candidates; and "connected" never covered any of them.
Part 3: Find the fault
Chapter 21: Four boxes and half-splitting
- The phone shows connected, and the Serial Monitor shows each letter as you press it. Which half of the car is left to suspect, and which parts are now cleared?
- Put the fix in order. The car won't drive from the phone. In what order would an expert do these? (a) Switch off, then check the Bluetooth module's TXD wire on pin 2. (b) Press
Fand watch the Serial Monitor. (c) Say what is happening: which lights are on, what the phone says. (d) PressFagain and watch forGot F from phoneandCar heard: F. - The Bluetooth module's LED is off, and the wheels don't turn from the laptop either. Which do you check first, and why? (This goes back to the battery line in the book.)
Answers
- The half after the board: the sketch's decision, the six signal wires, the motor driver, the motors, and the battery's feed to the motor driver. The phone, the radio link, the Bluetooth module and its wire into pin 2 are cleared, because the letter could not have reached the Serial Monitor without them.
- (c), (b), (a), (d). Look first; then the test in the middle, which says whether the letter reaches the board; then change one thing, with the power off; then the same test again, this time watching for both directions.
- The power line: the switch, the cells, and the lead to the board's Vin pin. Two boxes failing at once almost always share one cause, and the only thing these two share is power.
Chapter 22: Worked example: the speed that never changed
- Why did nobody notice the fault for ten years? Give two reasons.
- Name a second fault with exactly the same symptom, "every speed is the same", that has nothing to do with the sketch. (It comes from the book.)
- Find the fault in this pin list, and predict what the car does. A friend wired ENA to pin 5 and ENB to pin 7; the four direction wires are on 12, 11, 10 and 9, and the sketch matches the wires. What happens at speed
1? - Put the expert's steps in order: (a) predict what the car should do if the pins are the fault; (b) list the two things that can make every speed the same; (c) check that the direction letters all work; (d) read the two speed-pin lines of the sketch; (e) look at the jumper caps on ENA and ENB.
Answers
- Any two of: it failed silently (the board rounds instead of giving an error); the car still did everything people tested it for (go, stop, turn); and nobody had ever seen it crawl, so nobody missed it. A fault is only noticed when a test compares the right two things.
- A jumper cap left on ENA and ENB. The cap ties the speed input to full power, so the motor driver ignores the board's speed wire. That is why the wheels test checks speed
1against speed9. - Pin 7 has no
~, so it can't do speed. ENB drives the right side in this book's wiring (OUT3 and OUT4), so the right side gets 150 or more, which rounds to full power, at every speed; the left side, on pin 5, really slows down. At speed1the left side crawls and the right side runs at full power, so the car curves round towards its slow side. At speed9both sides are near full power and it runs nearly straight. - (c), (b), (e), (d), (a). Clear the boxes (direction works, so letters arrive and the board runs); list both suspects; look at the caps, which takes seconds; read the two pin lines; then predict, and compare the prediction with the symptom.
Chapter 23: Worked examples: spins on the spot, and connected but still
- Finish the table in Chapter 23: fill in every empty row for Example 2.
- Find the fault in the figure. Which two wires are wrong, and is anything damaged?
- Predict, for Example 1 before the fix: you send
B. What does each side do, and what does the car do on the floor? (This uses the patterns from Example 1's split.) - Put the fix for Example 1 in order: (a) send
Fand watch all four wheels; (b) switch off; (c) tighten both screws and tug each wire; (d) at OUT3 and OUT4, swap the red and black wires of both right motors.
Answers
- Which box: the wheels test clears the wheels, the board and the battery. Connected clears the phone and the module's power and radio. Left: the wires between the module and the board. Split: typing
Fin the Serial Monitor sends the board's answer,Car heard: F, out through pin 3 to the module and the phone. It came out asGot F from USBwith turning wheels, but noCar heardon the phone: so the board→module direction is broken too, not only the module→board direction. Suspects: a fault that breaks both directions while power and radio work is the data pair, TXD and RXD, swapped or both unseated. Change one thing: USB out, switch off; swap the two data wires at the module, so TXD goes to pin 2 and RXD to hole a9, where the two resistors meet (steps C7 and C8). Test again: reconnect, press Forward: the Serial Monitor showsGot F from phoneand the phone showsCar heard: F. Say what you found: "Connected, but no letters either way: the module's TXD and RXD wires were swapped." - The two data wires are swapped at the module end: TXD goes to hole a9, where the two resistors meet, and RXD goes to pin 2. Both ends are talking into each other's mouths and neither is listening, so nothing gets through in either direction. Swapped at this end, nothing should be damaged: pin 3's 5 V meets the module's 3.3 V
TXDonly through the 1 kΩ resistor, which keeps the current under 2 mA. How sure: reasoned from the circuit, not staged. Swapped at the board end there is no resistor in the way, so never leave it like that. Swap the two wires back with the power off. Bdrives the left side backward. The right side, flipped, turns forward. The sides turn opposite ways, so the car spins on the spot, the other way fromF. (FandBspin;LandRdrive straight. That pattern is the signature of one side flipped.)- (b), (d), (c), (a). Power off before any wire moves, then the one change, then the tug test, then the same test as the symptom.
Chapter 24: Your Serial Monitor is a probe
- You open the Serial Monitor and see a line of odd symbols instead of
Car ready. Which setting do you check, and what should it say? - Predict: the line-ending menu says Newline. You type
Band press Enter. What two lines appear, and what does the car do? - Find the fault in this Serial Monitor. A child with the HC-06 build types in the Android app and says "it won't go". The Serial Monitor shows
Got f from phone. What's wrong, and what is the fix? - Put the probe checks in order. The car won't drive from the phone. (a) Press Forward and look for
Got F from phone. (b) Check the two menus: 9600 baud and No line ending. (c) Look forCar readyand the steady L light. (d) TypeFin the Serial Monitor and watch the phone forCar heard: F.
Answers
- The baud menu at the bottom of the Serial Monitor. It must say 9600, the speed in the car's sketch. Odd symbols mean bytes are arriving at the wrong speed, so the link and the wiring are fine.
Got B from USB, thenGot (newline) from USB. The newline arrives about a thousandth of a second after theBand counts as "anything else", so it stops the car almost before it starts: at most a twitch backward, and usually no beep, because the beep only gets a turn every tenth of a second. Set the menu to No line ending.- A lower-case
f. The sketch only knows a capitalF, sofcounts as "anything else" and stops the car. The letter arrived perfectly; it was the wrong letter. Type a capitalF(or set up the app's buttons to send capitals). - (b), (c), (a), (d). Settings first, or nothing else you read can be trusted; then is the sketch running; then did the letter arrive; then, if it did not, does the other direction work on its own.
Chapter 25: Ten broken cars
For each car, name the box, the part and the one change that fixes it.
- Car 1 · Every speed the same
- Car 2 · The right side is dead
- Car 3 · Backwards, and beeping
- Car 4 · Jerks and stops
- Car 5 · Fine with the laptop, dead on the floor
- Car 6 · It used to crawl
- Car 7 · It drives, but never answers
- Car 8 · The laptop can, the phone can't
- Car 9 · "I updated the sketch"
- Car 10 · The iPhone that can't find it
Answers
- The wheels box, the speed half: the jumper caps are back on ENA and ENB. Someone thought they had gone missing and put them back, and the two speed wires were left hanging. A cap ties the speed input to full power, so the motor driver ignores the board. Fix: switch off, pull both caps off, push the speed wires back onto ENA and ENB, and test speed
1against speed9. How sure: bench-proven that speed varies with the caps off (the original car, August 2026); the caps-on behaviour is from the motor driver's documentation. - The wheels box, the right side: the right motors' wires have pulled out of OUT3 and OUT4. Everything that only the right side uses is a suspect: the ENB, IN3 and IN4 wires and the motor wires in OUT3 and OUT4. A fall loosens screw terminals more easily than push-on wires, and a tug test checks them in seconds, so check the terminals first. Fix: switch off, push the wires back in, screw down, tug each one, test. How sure: reasoned from the circuit; the other suspects give the same symptom, which is why the tug test comes first and the wires next.
- The wheels box, both sides: both motor pairs are the other way round. The beep sounds on Back, so the sketch chose "back" correctly; the wheels did the opposite. The board is right and the wires are wrong. Fix: switch off, swap red and black on one side (both motors), and test: the car now spins on
F, which is progress: it is the signature of one flipped side from the book. Then swap the other side and test again. How sure: the beep-on-Bis in the sketch (tested on a computer); the rest is reasoned from how a motor reverses. - Not a box: the Serial Monitor's line-ending menu. The Serial Monitor shows
Got (newline) from USBstraight after every letter. The car obeys the letter for about a thousandth of a second, then the newline counts as "anything else" and stops it. Fix: set the menu to No line ending. How sure: tested on a computer; the size of the jerk is not measured. - The power line: the jumper from the motor driver's +12V screw to the board's Vin pin (or its partner, GND to GND). Two boxes dark at once means the one thing they share, and the board's ON light being out says the board has no power; the module gets its power from the board. With the USB in, the laptop fed the board and hid the fault. Fix: switch off; the parent takes the cells out; redo steps B26 and B27 and tug both ends; cells in, switch on; unplug the USB and check the ON light stays lit (the last check of the wheels test). How sure: the original car needed exactly this lead to run without the USB.
- The power line: the cells are tired. What changed was an afternoon of driving. As the cells run down they give less push, so each speed setting delivers less to the motors, and the slowest settings no longer overcome the car's weight and friction. Don't leave the motors humming: send
S. Then switch off; the parent charges the cells, following the rules in the book. If it carries on, the book explains what a tired battery does next. How sure: reasoned from the circuit and the cells' behaviour; how many speeds stop working depends on your cells and is not measured. - The Bluetooth module's listening wire: the 1 kΩ resistor's leg is in the wrong column. Letters arrive, answers don't, even for a typed letter: the board-to-module direction is broken and nothing else. In the figure, the 1 kΩ's second leg should be in d9, in column 9 with the 2 kΩ and the RXD wire. It is in d8, a column that nothing else uses, so the board's answer never reaches the module. Fix: USB out, switch off; move that leg to d9 (step C2 in the book); test with a typed
F. How sure: reasoned from the circuit, with the resistors' values and the sketch's answer tested on a computer. - The Bluetooth module's talking wire: TXD has slipped off pin 2. The
Car heard: Fon the phone proves the board → resistors → module → radio → phone path, and that the module has power. The only part that phone-to-board letters use and nothing else does is the wire from the module's TXD to pin 2. Fix: USB out, switch off; push it back onto pin 2 (step C7); test from the phone. How sure: reasoned from the wiring and the sketch, which is tested on a computer. - The sketch:
BT_BAUDis 38400, and the module talks at 9600. A line appears for every press, so something arrives each time and the wires and radio link work. But it is never the letter that was sent: the two ends disagree about speed. What changed was the sketch. The HC-06 and the DSD TECH HM-10 both talk at 9600 out of the box (their datasheets say so); 38400 is the speed an HC-05, a different module, uses for its setup commands, and tutorials about it are full of that number. Fix: change it back to 9600, upload, test. How sure: the sketch's side is tested on a computer and the module speeds are from the datasheets; the exact codes you'd see depend on the letter and are not predicted. (Some HM-10s with newer firmware are reported to start at 115200 instead: the same symptom, on a car nobody has edited. That is a module setting, and Make It Connect covers changing it.) - The phone box: the browser. On an iPhone, Chrome is built on the same engine as Safari, and that engine has no Web Bluetooth, the part of a browser the remote page needs to reach the car. Fix: install the free Bluefy browser and open the remote there. How sure: from the browsers' published support (checked August 2026 for Make It Connect); recheck when Apple or Google change it.
Part 4: Program the car
Chapter 26: Reading a sketch: once, then forever
- You unplug the USB cable and plug it back in. Does the car remember it was driving forwards? Use
setup()to explain your answer. - Is
loop()doing two things at once when the car drives and beeps? What does it actually do? - Put these in the order the board does them after you press reset: (a)
Got F from USBappears; (b) the L light comes on; (c)Car readyappears; (d) you sendF; (e) the wheels turn.
Answers
- No. A restart runs
setup()again, which sets all four direction pins HIGH (wheels held still) and starts with no letter inbtsignal, so the car sits still until it gets a new letter (Chapter 26). - No. It does one line at a time: listen, act, beep, then round again, fast enough that it looks like all three at once (Chapter 26).
- (c), (b), (d), (a), (e).
Car readyis printed just before the L light is switched on, both insetup(). The wheels turn in the Act step, afterreport()has printed the line.
Chapter 27: The letter dispatcher
- The Serial Monitor is set to Newline. You send
F. Predict exactly which two lines appear in the Serial Monitor and what the wheels do. - You want to add a letter
H. You haven't written a branch for it yet. What does the car do today when it receivesH, and which branch decides that? - Find the fault. A friend's Serial Monitor shows this, and their car won't drive from the laptop:
``text Car ready Got F from USB Got (return) from USB Got (newline) from USB ``
What setting do they change, and to what?
- Put the chain in order so that
Fdrives forwards,Bdrives backwards and every other letter stops the car. One piece doesn't belong: leave it out and say why. (a)else { ...all four direction pins HIGH... }; (b)if (btsignal == 'F') { ...forwards... }; (c)else if (btsignal == 'B') { ...backwards... }; (d)else if (btsignal == 'F') { ...forwards... }.
Answers
Got F from USBand thenGot (newline) from USB. The wheels twitch at most, because the newline reaches theelsebranch on the next pass and stops the car (Chapter 27).- It stops.
Hmatches none of the questions, so it falls to the finalelse, which sets all four direction pins HIGH (Chapter 27). - The line-ending menu is on Both NL & CR. Set it to No line ending (the table in Chapter 27).
- (b), (c), (a). The chain starts with
ifand the catch-allelsegoes last. (d) doesn't belong: a secondFquestion could never run, because (b) always answers yes first. Chapter 31 finds exactly this mistake in the car's own sketch.
Chapter 28: Making it move: the motion code
- In the
Bbranch,in3is LOW andin4is HIGH. What does side B do, and why? - Predict: you swap the values on
in3andin4in every branch. Which letters now do something different, and what? - Put the fix in order.
Fmakes the car spin instead of going forwards: (a) sendFagain on the box; (b) switch the battery off; (c) see which side turns backwards; (d) swap the red and black wires of that side's motors at the screw terminal; (e) switch the battery on.
Answers
- It turns backwards. LOW, HIGH is the reverse of side B's forward pattern (HIGH, LOW) (the figure).
- Side B reverses in every motion.
FandBnow spin the car;Lnow drives it backwards andRforwards. Stop is unchanged, because HIGH, HIGH swapped is still HIGH, HIGH. - (c), (b), (d), (e), (a). Find the side first, with the car running on the box; the battery goes off before you touch a wire; and after any change to the motor wires you go back to
F.
Chapter 29: The speed ladder
- Sending
0doesn't stop the car. Which branch would you change to make0stop it, and what number would you giveset_speed()? - You change the
'1'branch toset_speed(40). What do you expect on the floor, and why? - Every speed letter gives the same speed. Name two causes, and say which one you would check first.
- Put the floor-finding steps in order. One step doesn't belong: leave it out and say why. \(a) send
1, thenF, and watch; (b) Save As a new name; (c) change150to120in the'1'branch; (d) switch the battery off and upload; (e) change all ten speed numbers at once, to save time; (f) Verify.
Answers
- The
'0'branch:set_speed(0)means the speed pins are never on, so the motors get no power (Chapter 29). The direction pins don't change, so a later digit starts the car again in the same direction. - The motors hum, or stay silent, and the car doesn't move: 40 is far below a floor of around 120–150 (Chapter 29).
- A jumper cap left on ENA/ENB, or a speed wire on a pin that can't do the fast on–off (only 3, 5, 6, 9, 10 and 11 can on an Uno). Check the jumper caps first: it is a look, not a rewire (Chapter 22).
- (b), (c), (f), (d), (a). (e) doesn't belong: change one thing at a time, or you can't tell which change made the difference (Chapter 29).
Chapter 30: Sound, and why the car stops listening while it sings
- The horn (
V) never blocksloop(), but it never stops by itself either. Why doesn't it stop after one second, whentone()was told 1000 ms? - Predict: in the original sketch, you send
X, then typeFfive times in the Serial Monitor during the song. What happens when the song ends? - In your new version, you send
X, thenS, thenXagain. Does the song start from the beginning? Look atnextNoteto decide. - Put these lines of
play_happy_birthday_step()in order. One line doesn't belong: leave it out and say why. (a)noteStarted = millis();; (b)if (millis() - noteStarted < pauseBetweenNotes) { return; }; (c)nextNote = nextNote + 1;; (d)tone(buzzerpin, melodyHappy[nextNote], noteDuration);; (e)delay(pauseBetweenNotes);.
Answers
- Because
Vis sticky: every pass ofloop()callstone()again and starts a new second (Chapter 30). - The five
Fs wait in the queue. When the song ends the board reads them one per pass, the car goes forwards, and the song doesn't repeat, because the newest letter is nowF. - No.
nextNotestill holds where the song stopped, so it carries on from that note. To restart it, setnextNote = 0;in the branch that stops the car. - (b), (d), (a), (c). Check the clock first, play the note, note the time, move on to the next note. (e) doesn't belong:
delay()is the line that froze the car in the first place (Chapter 30).
Chapter 31: Find it: the bug since 2016
- Which branch can never run, and why?
- Before the fix, what does the car do when it receives
uwhile driving? Which branch decides that? - Put the fix in order: (a) send
F, thenu, and watch the wheels; (b) change the second'U'to'u'; (c) Save As a new name; (d) upload; (e) switch the battery off.
Answers
- The second
else if (btsignal == 'U'). The firstUbranch matches first and everyelsebelow it is skipped (Chapter 31, and Chapter 27's "first yes wins"). - It stops. No branch asks about
'u', so it reaches the finalelse, which sets all four direction pins HIGH. - (c), (b), (e), (d), (a). Saving a copy comes before any change; the battery goes off before the upload.
Chapter 32: Change it safely, then make it yours
- Why can this car take a new sketch with the Bluetooth module still connected, when some cars can't?
- You add
else if (btsignal == 'T')after the finalelse. What doesTdo, and why? - Design a letter
Cthat makes the car crawl forwards at speed 150. Write the branch, and say what the car's speed will be after you sendCand thenF.
Answers
- Its module is on pins 2 and 3. Uploads use pins 0 and 1, so nothing else is talking on the upload wires (Chapter 32).
- Nothing: the sketch won't compile. The compiler stops with
'else' without a previous 'if', because anelsecan't follow the finalelse. The branch must go before it (Chapter 32). else if (btsignal == 'C') { set_speed(150); digitalWrite(in1, LOW); digitalWrite(in2, HIGH); digitalWrite(in3, HIGH); digitalWrite(in4, LOW); }, placed before the finalelse. AfterCthenF, the speed stays 150:Fdoesn't change the speed.
Part 5: For parents, clubs and teachers
Chapter 33: What this build teaches, honestly
- Before you start, write one sentence: what would you accept, a week after the first drive, as evidence that your child learned something? Keep it, and compare it with Chapter 35.
- Your child's friend's parent says the build "will make him a better programmer". What can you honestly say instead?
Answers
- There is no single right answer. A good one names something your child does without the book: "she can tell me which box a fault is in", or "he can fix a swapped motor wire on his own". "He enjoyed it" is worth having, but it is not evidence of learning (Chapter 33).
- That children and teachers say they enjoy builds like this, and that the research does not show it teaches programming better than a screen does. What it can teach is a picture of the whole car and a way to find a fault, and you can check both a week later (Chapter 33).
Chapter 34: Running it with 6 to 12 children
- Two pairs reach the power step at the same time, and you are the only adult in the room. What do you do?
- A pair has been stuck for ten minutes in Stage C and the builder is pulling wires out to start again. What do you say first?
- You are planning the club's first session. It is 45 minutes long. Where should it end?
Answers
- Do one table at a time. The other pair reads the pre-power checklist aloud, with the switch off, until you arrive. The cells stay in your box until you are at their table (Chapter 34).
- "Stop. Switch off." Then rerun the wheels test from the Serial Monitor. Starting again throws away what the stage tests proved. If the wheels test still passes, the board and the wheels are fine, and the fault is in the Bluetooth module's wiring or the phone (Chapter 34).
- At a stopping point: after the Stage A test, if it is the first session. Nobody knows yet whether a group reaches it in 45 minutes, so have the pairs read Chapters 3 to 5 before the session, and if the uploads haven't started by about half-way, end after the find-it list instead. Spare time goes on the "Try this" experiments, never on starting Stage B (Chapter 34).
Chapter 35: The one-week check
- Your child fixed planted fault A in four minutes, but when you ask why it works now, says "I just tried swapping them". Which rubric rows can you score from that, and what is the next step?
- Why does this check happen a week later, rather than right after the first drive?
Answers
The six one-week questions:
- Fine on the box, not on the floor. The board is restarting: the L light goes out because the board resets, and comes back on when the sketch starts again. On the floor the motors work much harder and pull more from the cells; tired or half-charged cells can't keep the voltage up, and the board's supply dips. That is the battery, feeding the board. Charge the cells first. Then, switch off, and tug-test the battery leads at the board's Vin and GND.
- The speed letters do nothing. The phone, the module and the board all work: letters arrive from both and the car obeys the direction letters. The fault is in how speed reaches the motor driver: both jumper caps still on ENA and ENB, or both speed wires on pins that can't control speed (only 3, 5, 6, 9, 10 and 11 can). Look at the motor driver's caps first: it needs no tools.
- Backwards on both sides. Both sides are wired the same way round, but that way is the opposite of what the sketch calls forward. Left and Right swap for the same reason: each side turns the opposite way to the one the sketch asks for. The smallest fix is to swap the two motor wires on both sides, with the switch off. Swapping one side would make it spin.
- One side flat out. A jumper cap left on (or put back on) that side's ENA or ENB, or that side's speed wire on a pin that can't control speed. Look at the motor driver first: a cap is visible. If there is none, follow that side's speed wire to the board and check its pin number against the pin table.
- Silent car. Not the phone, the Bluetooth module or the link into the board: the car drives, so letters arrive and the board acts on them. The fault is in the board's output to the buzzer: its three wires. Switch off, then check the buzzer's S wire is on pin 4, and its + and − are in the breadboard columns the board's 5V and GND go to (Chapter 8).
- Never connects. The Bluetooth module's box, and the phone's side of it: the blinking light says the module has power but no connection. Check that you opened the remote page in Chrome on Android or Bluefy on an iPhone (not the phone's Bluetooth settings, and not Safari); and on Android, that Chrome is allowed to find nearby devices.
Check yourself:
- From that alone, only "Says what was found", and it is Getting there. The other rows need your notes from the timer, because a fast fix can still be a guess. The next step is to ask "why did that fix it?" after every fix (the table in Chapter 35).
- Because how easy something felt on the day is a poor guide to what was learned. What your child can still do a week later, without the book, is the honest measure (Chapter 33).
Chapter 36: Where next: extensions and resources
- Your child wants to add the stop-before-the-wall sensor next weekend. This edition has no steps for it. What two things do you check before you start?
- Why might the fail-safe be the right first upgrade, even though it is the least exciting?
Answers
- Which pins are free on your car (2 and 3 are the Bluetooth module's, 4 the buzzer's, 5, 6 and 9 to 12 the motor driver's), and whether there is a tested guide for it yet: the next edition's Part 5, or the page at troniction.com/go/car-next (Chapter 36).
- Because the car keeps doing the last thing it was told. If the phone stops sending, it keeps driving. A fail-safe makes every later upgrade safer to test on the floor (Chapter 36).