
Build a Car With Your Kid · Chapter 9
Stage B test: the wheels
Stage B proves the wheels and the battery feeding the board. The car stays on its box, all four wheels off the table. Tick the checklist and the steps as you go; tap any “Instead” that matches what you see. After any change to the motor wires, go back to step B50 and type F again.
Note
This stage. The battery holder's two leads go to the motor driver and to the board. You check six things together, the parent puts the cells in, and the child switches on. Then, with the car on a box, the child drives the wheels by typing letters on the laptop. The last check: unplug the USB cable and the board stays on. The end of this test is a stopping point.
The checklist before power
Six checks. They prevent the only expensive mistakes in this book. One of you reads each line aloud; the other checks it on the car and says "yes". Here they are.
The checklist before power. One reads, one checks. Tick each line.
Our guesses for F: left wheels ☐ forward ☐ backward · right wheels ☐ forward ☐ backward
The checklist. One reads, one checks, every line, out loud. Tick each one.
Talk about it
Before the cells go in: "Point to the wire that will carry the most power. Why that one?"
Listen for: a battery lead, the red or the black one at the holder. "Because it feeds everything" is right.
Cells in, switch on
This is the moment the car becomes live, so the parent does the cells, and the child does the switch. The USB cable stays out, so the board's ON light can only come from the battery: this is the first check that the battery reaches the board.
Warning
The parent puts the cells in. Check the switch is off first. Match each cell's + end to the + mark inside the holder. A cell in backwards can damage the motor driver and the board.
Check the switch is off. Put the two cells in, each matching the + mark in the holder.
Switch the holder on. Look at the board's ON light and the motor driver's small light. No wheel should move.
Test
You should see: the board's ON light and the motor driver's light both come on, and nothing gets hot.
Instead: no light anywhere.
Meaning: no power is reaching the motor driver or the board.
Fix: switch off. The parent checks the cells are the right way round and pushed fully in. Then check the red and black leads are clamped in their screws (B38, B42).
Instead: the motor driver's light is on, but the board's ON light is off.
Meaning: the battery reaches the motor driver but not the board.
Fix: switch off; the parent takes the cells out. Check B37 to B44: the jumper from +12V to Vin, and the jumper from GND to GND. Tug both ends of each.
Instead: something feels hot, smells hot, or the lights flicker oddly.
Meaning: something is wired wrongly, most likely the battery leads swapped.
Fix: switch off at once. The parent takes the cells out. Go through the checklist again, starting at line 1.
The wheels test
Now the wheels box gets its test, driven from the laptop. Plug in the USB cable, open the Serial Monitor, choose 9600, and set the line ending to No line ending. Then type single letters and press Enter after each one. F for forward, B for back, L for left, R for right, S to stop. The car keeps doing the last thing you typed until you type something else, so S is your stop button.
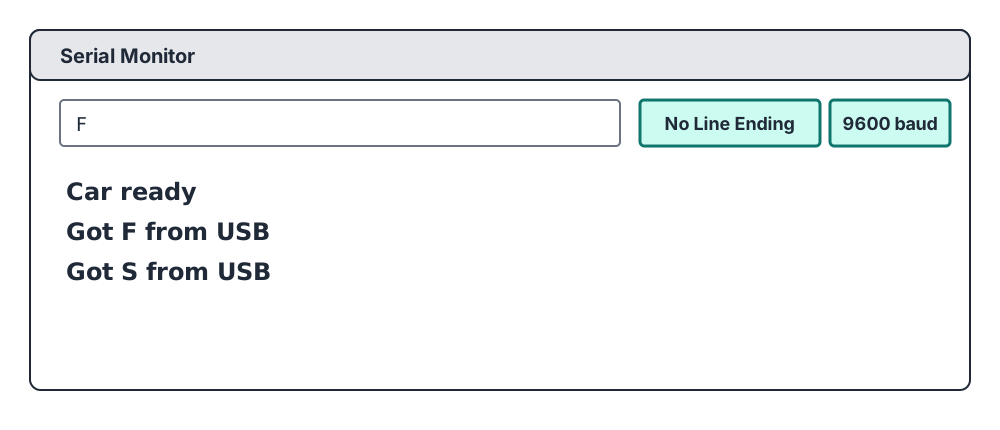
Plug the USB cable into the board and the laptop. Open the Serial Monitor. Check it shows 9600 baud and No Line Ending.
Before the first letter, you both guess.
Talk about it
"Which way will the left wheels turn when we type F? And the right wheels? Tick both guesses on the checklist."
Listen for: any guess is fine. What matters is checking it. If any wheels go the wrong way, the test box says which wires to swap.
Type F and press Enter. Watch all four wheels. Then type S and press Enter.
The Serial Monitor shows every letter the board receives, with where it came from: Got F from USB. That's the board telling you the letter arrived. And one rule for this whole test: after any change to the motor wires, go back to step B50 and type F again.
Test
You should see: Got F from USB, and all four wheels turn forward.
Instead: all four wheels turn backwards.
Meaning: every motor is wired the other way round for this sketch. That's normal. It depends on how your motors were made, and nothing is broken.
Fix: type S, switch off. On all four motors, swap red and black at the motor driver. Switch on and type F again.
Instead: one side's two wheels turn backwards.
Meaning: that side's motors are the other way round.
Fix: type S, switch off. On that side only, swap red and black on both motors. Switch on and type F again.
Instead: one wheel turns backwards and the other wheel on its side turns forwards.
Meaning: that one motor's wires are the other way round.
Fix: type S, switch off, and swap red and black on the motor that turns backwards. Type F again.
Instead: Got F from USB appears, but no wheel moves.
Meaning: the board got the letter, so the problem is in the wheels box or its power.
Fix: is the switch on? Are the cells in? Are the battery leads and both jumpers clamped (B37 to B44)? Are the six signal wires on the right pins (B29 to B34)? If the wheels twitch and stop and the Serial Monitor shows Got (newline) from USB, choose No Line Ending (Chapter 12).
Type B, then S. All four wheels turn backwards, and the buzzer beeps while they do.
Type L, then S. The left wheels turn backwards and the right wheels forwards: on the floor, the car would spin to the left. Then R, then S: the other way round.
Test
You should see: L spins the car to the left.
Instead: F is right, but L spins the car to the right.
Meaning: the left motors are on OUT3 and OUT4, and the right ones are on OUT1 and OUT2.
Fix: type S, switch off. Move the left motors' wires to OUT1 and OUT2, and the right motors' to OUT3 and OUT4. Then go back to B50 and type F. All four wheels will probably turn backwards now; the first row of the F test fixes that.
Type F. While the wheels turn, type 1, then 9, then S.
Test
You should see: speed 1 is clearly slower than speed 9.
Instead: every speed is the same.
Meaning: a cap is still on ENA or ENB, or a speed wire is on a pin without the ~ mark.
Fix: switch off. Check B18 and B19 (caps off) and B29 and B30 (pins 5 and 6).
Talk about it
After the speeds: "Speed 1 crawls and 9 runs. What is the pin doing differently?"
Listen for: "it's on for less of the time" or "it gives less push". A guess is fine. Part 2 has the answer.
The last check: unplug the USB cable
One more test, and it's the one that proves the battery really feeds the board. Type S, then the child unplugs the USB cable. The board's ON light must stay on.
Type S. Then unplug the USB cable from the board. Look at the board's ON light.
Test
You should see: the ON light stays on after the USB cable comes out.
Instead: the ON light goes out.
Meaning: the battery reaches the motor driver but not the board. The board was running on the laptop's power all along.
Fix: switch off; the parent takes the cells out. Redo B37 to B44: the jumper from the +12V screw to Vin, and the jumper from the GND screw to GND. Tug both ends of each. Then the cells go back in and you test again.
This is a stopping point. Switch the holder off. The USB cable is already out.
Still stuck
Stop changing things. Run the loop from Chapter 3, out loud: look, which box, change one thing, test again, say what you found. Then go through the full table of symptoms, which starts from the first stage test that fails.
Still stuck after that? Write to [email protected] with the stage test that fails and exactly what you see. If the book turns out to be wrong, it gets a dated correction.
If the car doesn’t move: every symptom, its stage and its fix →The role card and the loop, to print →The stage tests: Stage A · Stage B · Stage C · Stage D