Connect HC 06 Bluetooth Module to Arduino
Connect HC 06 Bluetooth Module to Arduino
Are you looking to connect the HC-06 Bluetooth module to an Arduino project? Look no further! In this tutorial, we will guide you through the process of establishing a reliable connection between the HC-06 Bluetooth module and Arduino, allowing you to control your Troniction Cars remotely using a smartphone or any other Bluetooth-enabled device.
(This article is for Bluetooth HC-06 module only. For the information about connecting all the car components, visit this page: Connecting Car Components)
By integrating Bluetooth technology into your project, you can wirelessly communicate with the Arduino, sending commands and receiving data in real-time. The HC-06 Bluetooth module provides a convenient and cost-effective solution for establishing this wireless connection.
In this step-by-step tutorial, we will cover all the necessary components, wiring diagrams, and Arduino code needed to connect the HC-06 Bluetooth module to your Arduino board. We will explain the process of configuring the module and establishing a stable Bluetooth connection.
Whether you are a beginner or an experienced Arduino enthusiast, our comprehensive guide will ensure that you successfully integrate the HC-06 Bluetooth module into your Troniction Cars project. Get ready to unlock a whole new level of control and interactivity for your cars through wireless communication. Let's dive in and bring your project to life!
What is HC 06 Bluetooth Module
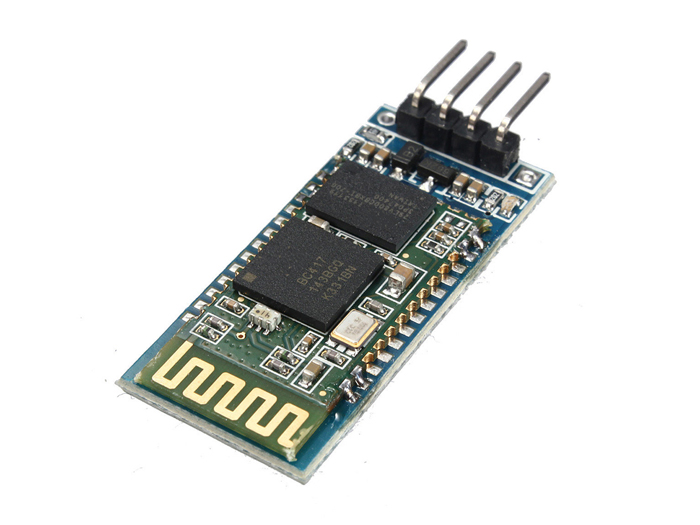
The HC-06 module is a popular Bluetooth module widely used for wireless communication in various electronic projects. It is specifically designed for simple and cost-effective Bluetooth connectivity. The HC-06 module acts as a Bluetooth serial port module, enabling wireless communication between electronic devices.
Download Bluetooth Module Datasheet
The module operates as a slave device, meaning it can only be connected to a master device, such as a smartphone, tablet, or computer, which initiates the Bluetooth connection. Once paired, the HC-06 module allows bidirectional data transmission between the master device and the Arduino or other microcontroller.
The HC-06 module uses Bluetooth 2.0 technology, supporting the Serial Port Profile (SPP) for communication. It operates at a frequency of 2.4 GHz and offers a range of approximately 10 meters (depending on the environment and surrounding obstacles).
One of the key features of the HC-06 module is its simplicity of use. It requires minimal wiring and can be easily integrated into Arduino or other microcontroller projects. Additionally, it has a standard pinout configuration, making it compatible with various development boards.
Overall, the HC-06 Bluetooth module provides a cost-effective and straightforward solution for enabling wireless communication in your projects, allowing you to control and exchange data wirelessly with other Bluetooth-enabled devices.
Connect Bluetooth Module HC-06 to Arduino
To connect the HC-06 Bluetooth module to an Arduino Uno board, follow these steps:
1. Gather Components:
Gather the required components
- Arduino Uno board
- HC-06 Bluetooth module
- Jumper wires (male-to-female)
2. Identify Pins
Identify the pins on the HC-06 module:
- VCC: Connects to the 5V pin on the Arduino Uno
- GND: Connects to the GND pin on the Arduino Uno
- TXD: Connects to the RX (receive) pin on the Arduino Uno
- RXD: Connects to the TX (transmit) pin on the Arduino Uno
3. Make Connections

Make the connections between the HC-06 module and Arduino Uno as follows:
- Connect the VCC pin of the HC-06 module to the 5V pin on the Arduino Uno.
- Connect the GND pin of the HC-06 module to the GND pin on the Arduino Uno.
- Connect the TXD pin of the HC-06 module to the RX (receive) pin (pin 0) on the Arduino Uno.
- Connect the RXD pin of the HC-06 module to the TX (transmit) pin (pin 1) on the Arduino Uno.
4. Bluetooth Coding
Once the connections are made, you are ready to upload a sketch to the Arduino Uno that will allow you to communicate with the HC-06 module. Here is a sample code snippet to get you started:
#include <SoftwareSerial.h>

SoftwareSerial bluetooth(0, 1);  // RX, TX

void setup() {
  Serial.begin(9600);
  bluetooth.begin(9600);
}

void loop() {
  if (bluetooth.available()) {
    char data = bluetooth.read();
    Serial.print(data);
  }

  if (Serial.available()) {
    char data = Serial.read();
    bluetooth.print(data);
  }
}
5. Upload the Bluetooth Sketch
Upload the code to the Arduino Uno using the Arduino IDE.
Open the Serial Monitor in the Arduino IDE to communicate with the HC-06 module. Set the baud rate to 9600 (or as per your module's configuration)
That's it! You have successfully connected the HC-06 Bluetooth module to the Arduino Uno board. You can now send and receive data wirelessly between your Arduino and any Bluetooth-enabled device paired with the HC-06 module.
(The above code is only for testing Bluetooth HC-06 module. For the information about writing all the car codes, visit this page: Car Code)
Share on [Twitter](https://twitter.com/intent/tweet?text=Connect HC 06 Bluetooth Module to Arduino&url=https://www.troniction.com/rc-car/how-to/connect-bluetooth-module-hc-06-to-arduino.html&via=&related=) or Facebook
Steps to Build
- Get - Get the Components
- Wire - Wire together Components
- Write - Write the Code
- Upload - Upload the Code
- Control - Control the Car
- Share - Share with Others