
Component
Buzzer
The buzzer is the smallest part on the car and the first one children go for. It sits on digital pin 2 and does three jobs in the sketch: a horn, a reversing beep, and Happy Birthday.
Buy the passive one
Two different parts are both sold as "Arduino buzzer", and they are not interchangeable.
- Active — there is an oscillator inside it. Give it a DC voltage and it makes one fixed tone, usually around 2 kHz. It cannot make any other note.
- Passive — no oscillator. It makes whatever frequency you feed it, which is exactly
what the Arduino
tone()function produces.
The car sketch calls tone(buzzerpin, melodyHappy[i], noteDuration) to play a
tune, so it needs the passive one. On an active buzzer, Happy Birthday comes out as a
single flat note held for the length of the song.
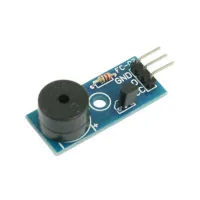
Telling them apart. The three-pin module boards are sold both ways and the silkscreen usually does not say which one you have — the blue MH-FMD board pictured on this page is sold as both. Where there is a KY number, KY-006 is the passive one and KY-012 is active. On a bare two-pin buzzer, turn it over: a passive one usually has an open green circuit board underneath, an active one is normally sealed with a plastic base and a sticker.
The test that settles it is to touch the buzzer briefly across 3.3V and GND. An active one beeps. A passive one only clicks.
Wiring
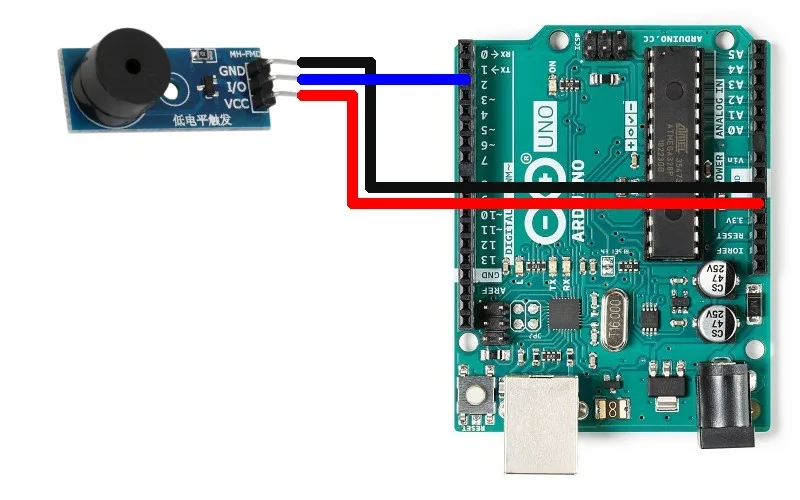
The module has three pins.
- I/O or S → Arduino digital pin 2
- VCC → Arduino 5V
- GND → Arduino GND
A bare two-pin buzzer works too: one leg to pin 2, the other to GND. If one leg is marked +, that is the one that goes to pin 2.
How much current it pulls
A small buzzer draws roughly 30 mA. An Arduino output pin is rated at 40 mA absolute maximum, and 20 mA is the figure Atmel actually recommends designing to. So a bare buzzer straight off pin 2 is inside the limit, but not by much. That is a good reason to prefer the three-pin module, which usually puts a small transistor between the pin and the buzzer and lets the 5V rail do the work.
One thing tone() quietly breaks
On an Uno, tone() takes over Timer2, so analogWrite() stops
working on pins 3 and 11 for as long as a tone is playing. The car is safe from this by
accident and by design: its speed pins are 5 and 6, which are on Timer0. The wheels hold their
speed while the horn sounds.
Testing it on its own
Before you wire the rest of the car, put this in an empty sketch's setup() and
upload it. One second of a 1 kHz tone means the buzzer, the pin and the wiring are all
good.
void setup() {
  tone(2, 1000, 1000);
}

void loop() {
}Every part of the car
 Arduino Uno R3: pins, power and limits
Brain
Arduino Uno R3: pins, power and limits
Brain
 L298N motor driver with Arduino: pinout, wiring and code
Motion
L298N motor driver with Arduino: pinout, wiring and code
Motion
 HC-06 Bluetooth module for Arduino
Control
HC-06 Bluetooth module for Arduino
Control
 Chassis, Wheels and Gear Motors
Motion
Buzzer
You are here
Chassis, Wheels and Gear Motors
Motion
Buzzer
You are here
 18650 Lithium-Ion Batteries
Power
18650 Lithium-Ion Batteries
Power
 18650 Battery Holder
Power
18650 Battery Holder
Power
 18650 Battery Charger
Power
18650 Battery Charger
Power
 Jumper Wires and Circuit Wire
Wiring
Jumper Wires and Circuit Wire
Wiring
 Transparent Enclosure Box
Housing
Transparent Enclosure Box
Housing
Build it. Understand it.
Get the complete illustrated guide and start your first car — free.